Before doing this...

 Switching the screen over time with effects, such as fade-in, fade-out, and blinds are called Transition(change) effects.
 In Kirikiri/KAG, the three kinds of transition, which can be used are cross-fade transition, universal transition, and scroll transition.
 Moreover, you can further enhance transition by using a plug-in (extrans.dll). Please refer to "Transition" of Kirikiri SDK help for details.

Cross-Fade transition

 Cross-fade transition is a simple screen transition effect.
 Therefore, the image before the transition and the image after the transition are needed in the transition (change). In the case of KAG, the fore layer is the image before the transition and the back layer is the image after the transition. That is, the image of the layer of the back page comes to the fore page.
 Along the transition, the image of the fore page is replaced by the image of the back page over time and the image of the back page becomes the only image eventually.


Note
 In KAG, Fade-out and Fade-in has no concept. After the fore page is made jet-black, the cross-fade transition is put on the black to do the fade-out.

Universal transition

 A universal transition is a generic transition change, and so-called "Screen-switching effects" can be freely made.

 To use it, a Rule image is needed for the transition, which is a gray-scale image. If it's size is smaller than that of the layer image that wants to do the transition, then it is automatically spread over regularly and used. The transition defines this image as it's "Rule" to go about doing the transition.
 The attributes time (time to do the transition) and vague ((vague area value)) are needed for the Universal transition.

 This explains it.

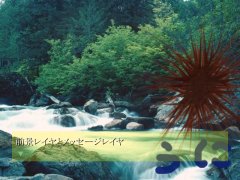
 Please look at the following images:

univtrans_A.pngunivtrans_B.pngunivtrans_R.png
Before Transition. After Transition. Rule Image


 Thus, it is assumed that it changes from image A to image B. Moreover, in universal transition, the rule image graduates from the black to white(In this case, from top to bottom).

 Well, the transition progresses like this when vague (vague area value) is set to 1. For convenience, we have shown the transition side-by-side, but it is displayed in the same place as it is continuously in practice.

univtrans_V1.png
At vague=1


 In other words, it gradually replaces the image of B from the black parts in the rule image towards the white points.

 Let's have vague = 64:

univtrans_V64.png
At vague=64

 This time, the boundary of the image of A and the image of B has grown dim. Thus, increasing the value of vague, in the transition, neither A nor B image increase. You can specify a numerical value of 1 or more in vague.

 The transition can be freely done to the rule image by specifying not only a simple gradiants, but also various patterns in this way.

 In Kirikiri download page(http://kikyou.info/tvp/), you can find more than 20 types of rule images in the 「Transition library」, which are available for public use.

Scroll transition

 Unlike universal transition, scroll transition switches the original image(back screen) and switches it with the destination image(fore screen).
 The direction in which the image switching source (back screen) comes in, you can choose from four directions: left, top, right, and bottom.
 Moreover, the method of the scroll are of three kinds:

 First of all, if "stayfore" is specified for the 'stay' attribute, then the scroll transition becomes(it comes from below):

univtrans_Sstay.png
At stay=stayfore

  In this way, if "stayfore" is specified for stay attribute, the image of the fore page stays in place and back page enters from the outside.

 If "stayback" is specified for the 'stay' attribute, then the scroll transition becomes:

univtrans_Sstaysrc.png
At stay=stayback

 In this case, the fore layer goes out from behind and the layer of the back page comes into view.

 If "nostay" is specified for the 'stay' attribute, then the scroll transition becomes:

univtrans_Snostay.png
stay=nostay

  In this way, the targeted image is pushed on the original image. If the image A and B are consecutive in side or length and if they are scrolled, then the effect is issued through a big screen. However, the transition effect of the foreground layer doesn't turn so much. (^^;;

Fore and back page

 The most important concept in transition is Fore and Back page.
 Display the background in KAG SDK Help introduces both. Fore is usually visible, while the back is invisible page. Otherwise, both have same configuration.
 As for the transition in KAG, the content of the Fore page is displayed always in the direction that the content of the back page is gradually displayed on, removing the fore page's display. When the transition is completed, the contents of the Fore page will be the same as the contents of the back page completely.
 Thus, it is necessary to operate the back page before the transition.

 Here's an example. Suppose if only the background layer has to be replaced.
 First of all, it is assumed that the state of the layer before the transition was as follows(Left Back, Right Fore):


trans0f.jpgtrans0b.jpg
Before the transition

 At this point, the panoramic view layer is displayed in the fore layer and the Message Layer is displayed in the background layer. It is assumed the the back page doesn't have any state.
 It should be the same as the fore page on the back page with the [backlay] tag here:

trans0f.jpgtrans0f.jpg
After executing the backlay tag

 It is necessary to fiddle with the reverse page before the transition is done because the transition moves the content of the back page to the fore page.
 Because we want to replace the background layer here only, we load the image in the background layer of the back page.

trans0f.jpgtrans2b.jpg
After loading the image to the background layer of the back page

 The transition can finally be done here with the [trans] tag. Though it seems tedious, the transition will bring the image of the back page to the fore page.
In-between the transition(example of the transition):

trans3f.jpgtrans2b.jpg
During Transition

 Use the [wt] to wait for the transition's completion.
When the transition ends, the back page becomes the same as the fore page. As shown here:

trans2b.jpgtrans2b.jpg
After the transition

Background layer transition

 The trans is used for doing the transition.
 The Transition basically copies layer information the fore page with the [backlay] tag, fiddles with the part to be transitioned by the back page with the [image] tag, and executes the transition with the [trans] tag. Then, it is applied to the back page so that the change applied may change places into the present fore page.

 First of all, let's switch the background layer by the Cross-Fade transition:


[image storage="bg0" page=fore layer=base]
[wait time=200]
*start|Start
[cm]
Hello. The background layer is switched. [l][r]
[backlay]
[image storage="bg1" layer=base page=back]
[trans method=crossfade time=1500]
[wt]
Did it change?

 First of all, information of the fore layer is copied with the backlay tag.
 And, the image that should be displayed in the background layer of the back page is read next.
 At this point, the back page differs from the fore page in the matter of background image.
 Next, the transition is executed with the trans tag. Thus, it becomes Cross-Fade transition if method=crossfade attribute is specified for the trans tag. Time is specified 1.5 seconds in this example. Because the times is specified in milliseconds, time=1500 is written.

Note
 There is no accuracy for the unit of the millisecond, though you have to specify everything in millisecond.


 Afterwards, wt tag is used to wait for the end of the transition.KAG will just go to the next without waiting for the transition, if the wt tag is not written, so please remember to use the wt tag.

Note
 There is another tag, which isn't limited to the transition and doesn't wait for the end of its previous tag, but actually waits for the end of the tag itself. It is used "To process something over time" in KAG. As a result, the fade-out of BGM can be done while doing the transition.
 Moreover, Please be sure to write "wait" as the corresponding waiting tag. Even if different kinds of things want to use the 'wait' tag(such as wait tag in the end of transition), it is necessary to write "wait" tag corresponding correctly by one respondent.


 Moreover, if a universal transition is used, it looks as follows:

[image storage="bg0" page=fore layer=base]
[wait time=200]
*start|Start
[cm]
Hello. The background layer is switched. [l][r]
[backlay]
[image storage="bg1" layer=base page=back]
[trans method=universal rule="rule1" vague=1 time=1500]
[wt]
Did it change?


 This example executes the transition with the trans tag. Thus, it becomes a universal transition if method=universal is specified as the attribute of trans(It is considered as the universal transition even if the method attribute is omitted). In this example, the rule image chosen is "rule1", time is 1.5 seconds, and the vague area value is 1.

 Moreover, when you do the scroll transition from the right, with stay=nostay, then...


[image storage="bg0" page=fore layer=base]
[wait time=200]
*start|Stay
[cm]
Hello. The background layer is switched. [l][r]
[backlay]
[image storage="bg1" layer=base page=back]
[trans method=scroll from=right stay=nostay children=false time=1500]
[wt]
Did it change?

 It looks like this. It is specified with children=false here, because 「Child layer」 would move too, if not specified like this. In KAG, the background layer is the parent, while the foreground and the Message Layer is the child of the background layer.
 Child Layers can also be scrolled with children=true(default, so you can omit it).

Foreground layer transition

 The trans tag is also used to switch the foreground layer.


[image storage="bg0" page=fore layer=base]
[wait time=200]
*start|Start
[cm]
Hello. The foreground layer is displayed by using the transition. [l][r]
[backlay]
[image layer=0 page=back storage="fg0" visible=true]
; At this point, the foreground layer 0 of the fore page(default) becomes invisible
; While, the foreground layer 0 of the back page maintains the image by becoming visible
; The layer of the back page is same as the fore page, because of the effect of backlay tag
[trans method=crossfade time=1500][wt]
Next, switch the foreground layer. [l][r]
[backlay]
[image layer=0 page=back storage="fg1" visible=true]
; At this point, the foreground layer 0 of the back page is an image named fg1 
; The layer of the back page is same as the fore page, because of the effect of backlay tag
[trans method=crossfade time=1500][wt]
Then, the foreground layer is erased. [l][r]
[backlay]
[layopt layer=0 page=back visible=false]
; At this point, the foreground layer 0 of the back page becomes invisible
; The layer of the back page is same as the fore page, because of the effect of backlay tag
[trans method=crossfade time=1500][wt]
    Notice that ;(Semicolon) comes before any comment!

 In the above example, the foreground layer is displayed, and it is replaced with another foreground image, deleting the original image.
 First of all, all information on the fore page is copied using the backlay tag and then it is displayed on the screen. Because you want to display the image in the foreground layer and transition after that, the image is read to the foreground layer of the back page.
 After that the trans tag is used.

 Then we swapped foreground layer, but before that the backlay tag copied the transitioned part to the back page, and then the transition is carried out using the trans tag.

 After backlay copies it, the corresponding foreground layer is made invisible, and then the foreground layer is erased at the end. Invisible: Not being displayed on the screen. It disappears when the transition is done.

 One might worry because the back page (background and the child layer) originally hides even if it is specified visible=true, though you don't have to worry about the fore page being displayed even when it isn't set to visible=true.


Note
 When the layer attribute of the trans tag is omitted like the above-mentioned example, it is considered that base (background layer) was specified, and when the children attribute is omitted, it means(by default) that true was specified for it (transition along with the child layer).
 When you want to display the foreground layer by using the transition, or you want to replace it, and other various transitions, it is common to do the transition along with the child layer against the background layer. You can also put a transition separately for message layer and foreground layer, using layer=0 attribute, but it isn't used usually.

Message Layer Transition

 It is possible to use similar method for Message Layer Transition.
 In the message layer, you can do the similar operation using the [layopt] tag with visible=true and visible=false attribute.

 For instance, to display the Message layer on the screen using the transition(assumed to be originally hidden), use the following code. Also, after that, the Message Layer is made invisible using transition.


[layopt layer=message page=fore visible=false]
The Message Layer of the fore page is made invisible first
[layopt layer=message page=back visible=true]
The Message Layer of the back page is made visible
[wait time=200]
*start|Start
[cm]
[current page=back]
Chooses the Message Layer for use
[delay speed=nowait]
The character delaying speed is set to nowait
The Message Layer can be displayed while using the transition like this...[r]
[delay speed=user]
The character delaying speed is set to the custom setting by the user
[trans method=universal rule="trans1" vague=1 time=1500][wt]
Universal transition
[current page=fore]
The Message Layer of fore page is chosen for further use
[l]
Click waiting
[layopt layer=message page=back visible=false]
The Message Layer of the back page is now invisible
[trans method=universal rule="trans1" vague=1 time=1500][wt]
Transition